ANNEXES A : interface de fluent
The user interface to FLUENT consists of a graphical interface
with pull-down menus,
panels, and dialog boxes, as well as a textual command line
interface (described in the User's Guide).
1) GUI Components
FLUENT's graphical user interface (GUI) is made up of four
main components: a console window, control panels, dialog boxes, and graphics
windows. When you use the GUT, you will be interacting with one of these
components at all times. Figure 5.1.1 is a sample screen shot showing all of
the GUT components. The four GUT components are described below.
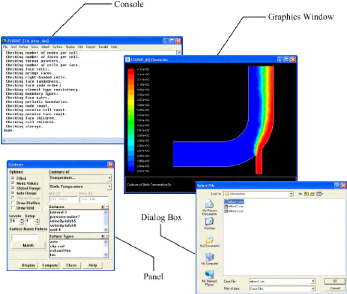
Figure 45 : FLUENT GUT Components
2) Console
The FLUENT Console is the main window that controls the
execution of the program. When using the Console to interact with FLUENT, you
have a choice between a text user interface (TUT) and a graphical user
interface (GUT). The Console contains a terminal emulator for the TUT and a
menu bar for the GUT. An overview of the GUT is described in this chapter,
while a more detailed description of the GUI is located in the User's Guide.
For more information about using the TUI, see the User's Guide as well.
Rédigé et soutenu par TTENTCHEU NSTEWE Maxwell
Phidelo Page a
MEMOIRE DE MASTER EP« étude de la convection
naturelle turbulente dans une enceinte à paroi chauffé »
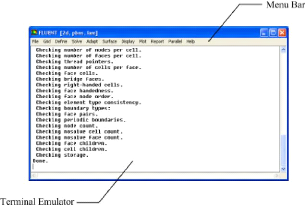
Figure 46 : the Comsole
2.1) Terminal Emulator
The terminal emulator is similar in behavior to
«xterm» or other Linux/UNIX command shell tools, or to the Command
Prompt window on Windows systems. It allows you to interact with the text
command interface (TUI). All textual output from the program (e.g., error
messages) is printed in the terminal emulator, and all typing is displayed on
the bottom line. As the number of text lines.
Grows, the lines will be scrolled off the top of the window.
The scroll bar on the right allows you to go back and look at the preceding
text. The terminal emulator accepts <Control-C> to let you interrupt the
program while it is working. It also lets you perform text copy and paste
operations between the Console and other X Window (or Windows) applications
that support copy and paste.
2.2) Menu Bar
The menu bar organizes the GUI menu hierarchy using a set of
pull-down menus. A pull-down menu contains items that perform commonly executed
actions. Figure 47 shows the FLUENT menu bar. Menu items are arranged to
correspond to the typical sequence of actions that you perform in FLUENT (i.e.,
from left to right and from top to bottom).
Figure 47 : The FLUENT Menu Bar
In addition to using the mouse, you can also select a pull-down
menu item using the
keyboard. Each pull-down menu label or menu item contains one
underlined character, known as
Rédigé et soutenu par TIENTCHEU NSIEWE Maxwell
Phidelo Page b
MEMOIRE DE MASTER EP« étude de la convection
naturelle turbulente dans une enceinte à paroi chauffé »
the mnemonic. Pressing the <Alt> key plus the mnemonic
character of a pull-down menu will display the menu. Once the pull-down menu is
selected and displayed, you can type a mnemonic character associated with an
item to select that item. If at any time you wish to cancel a menu selection
while a pull-down menu is posted, you can press the <Esc> key. For
example, to display the Help menu and select the Using Help...option, press
<Alt> h, then h.
A pull-down menu item may also have an accelerator key
associated with it. An accelerator key can be used to select a menu item
without displaying the pull-down menu. If a menu item has an associated
accelerator key, the key will be shown to the right of the item. For example,
if a pull-down menu contains the item Iterate... Ctrl+I, you can select this
item by holding down the <Ctrl> key and pressing the «I»
key.
3) Dialog Boxes
Dialog boxes are used to perform simple input/output tasks, such
as issuing warning and
error messages, or asking a question requiring a yes or no
answer. The following describes each type of dialog box:
> The Information dialog box is used to report some
information that FLUENT thinks you
should know. Once you have read the information, you can click
the OK button to close the dialog box ;
> The Warning dialog box is used to warn you of a potential
problem and ask you whether
or not you want to proceed with the current operation. If you
click the OK button, the operation will proceed. If you click the Cancel
button, the operation will be canceled;
> The Error dialog box is used to alert you of an error
that has occurred. Once you have read the error information, you can click the
OK button to close the dialog box.
> The Working dialog box is displayed when FLUENT is busy
performing a task. This is a special dialog box, because it requires no action
by you. It is there to let you know that you must wait. When the program is
finished, it will close the dialog box automatically. You can, however, abort
the task that is being performed by clicking the Cancel button.
> The Question dialog box is used to ask you a question
that requires a yes or no answer. You can click the appropriate button to
answer the question.
> The Select File dialog box enables you to choose a file
for reading or writing. You can
use it to look at your system directories and select a file.
This is a special type of dialog box that is described in more detail in the
following section.
Select File Dialog Box
Selecting Files in Windows
Rédigé et soutenu par TIENTCHEU NSIEWE Maxwell
Phidelo Page c
MEMOIRE DE MASTER EP« étude de la convection
naturelle turbulente dans une enceinte à paroi chauffé »
File selection in Windows systems is accomplished using the
standard Windows Select File dialog box (see Figure 48).
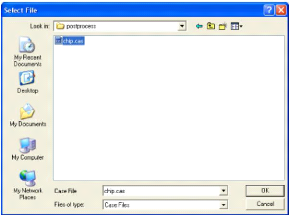
Figure 48 :The select file dialog box for Windows
See documentation regarding your Windows system for further
instructions on file selection. Selecting Files in UNIX or
Linux
For UNIX or Linux systems, note that the appearance of the
Select File dialog box will not always be the same.
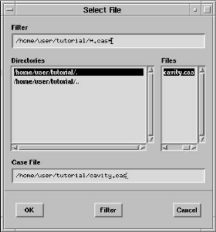
Figure 49 : the select file dialog box for UNIX or Linux
Platform
Rédigé et soutenu par TIENTCHEU NSIEWE Maxwell
Phidelo Page d
MEMOIRE DE MASTER EP« étude de la convection
naturelle turbulente dans une enceinte à paroi chauffé »
The version shown in Figure 5.3.2 will appear in almost all
cases, but it will be different if
you are loading external data files for use in an XY plot (see
the User?s Guide for more information). In such cases, the dialog box will look
like Figure 50.
The steps for file selection are as follows:
1. Go to the appropriate directory. You can do this in two
different ways:
? Enter the path to the desired directory in the Filter text
entry box and then press the <Enter> key or click the Filter button. Be
sure to include the final / character in the pathname, before the optional
search pattern (described below);
? Double-click a directory, and then a subdirectory, etc. in
the Directories list until you reach the directory you want. You can also click
once on a directory and then click the Filter button, instead of
double-clicking. Note that the «.»item represents the current
directory and the «..» item represents the parent directory.
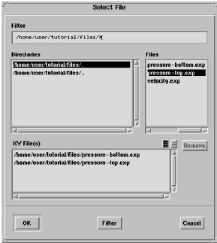
Figure 50 : another version select file dailog box for Unix or
Linux platforms
2. Specify the file name by selecting it in the Files list or
entering it in the File text entry box (if available) at the bottom of the
dialog box. The name of this text entry box will change depending on the type
of file you are selecting (Case File, Journal File, etc.).
That if you are searching for an existing file with a
nonstandard extension, you may need to modify the «search pattern» at
the end of the path in the Filter text entry box. For example, if you are
reading a data file, the default extension in the search path will be *.dat*,
and only those files that have a .dat extension will appear in the Files list.
If you want files with a .DAT extension
Rédigé et soutenu par TIENTCHEU NSIEWE Maxwell
Phidelo Page e
MEMOIRE DE MASTER EP« étude de la convection
naturelle turbulente dans une enceinte à paroi chauffé »
to appear in the Files list, you can change the search pattern
to *.DAT*. If you want all files in the directory to be listed in the Files
list, enter just * as the search pattern.
3. If you are reading multiple XY-plot data files, the
selected file will be added to the list of XY File(s). You can choose another
file, following the instructions above, and it will also be added to this list.
(If you accidentally select the wrong file, you can choose it in the XY File(s)
list and click the Remove button to remove it from the list of files to be
read.) Repeat until all of the desired files are in the XY File(s) list.
4. If you are writing a case, data, or radiation file, use
the Write Binary Files check box to specify whether the file should be written
as a text or binary file. You can read and edit a text file, but it will
require more storage space than the same file in binary format. Binary files
take up less space and can be read and written by FLUENT more quickly.
5. Click the OK button to read or write the specified file.
Shortcuts for this step are as follows:
? If your file appears in the Files list and you are not
reading an XY file, double-click it instead of just selecting it. This will
automatically activate the OK button. (If you are reading an XY file, you will
always have to click OK yourself. Clicking or double-clicking will just add the
selected file to the XY File(s) list.);
? If you entered the name of the file in the File text entry
box, you can press the <Enter> key instead of clicking the OK button.
4) Panels
Panels are used to perform more complicated input tasks.
Similar to a dialog box, a panel is displayed in a separate window, but working
with a panel is more akin to filling out a form. Each panel is unique and
employs various types of input controls that make up the form (see Figure 51).
The types of controls you will see are described in more detail in the User?s
Guide.
Rédigé et soutenu par TIENTCHEU NSIEWE Maxwell
Phidelo Page f
MEMOIRE DE MASTER EP« étude de la convection
naturelle turbulente dans une enceinte à paroi chauffé »
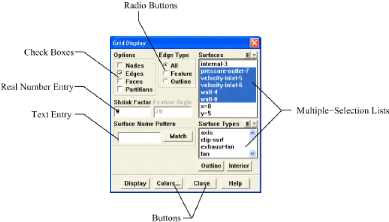
Figure 51 : the components of a typical FLUENT Panel
When you have finished entering data in a panel?s controls, you
will need to apply the
changes you have made, or cancel the changes, if desired. For
this task, each panel falls into one of two behavioral categories, depending on
how it was designed:
? The first category of panels is used in situations where it
is desirable to apply the changes and immediately close the panel. This type of
panel includes two button controls as described below.
OK applies any changes you have made to the panel, then closes
the panel.
Cancel closes the panel, ignoring any changes you have
made.
? The other category of panels is used in situations where it
is desirable to keep the panel displayed on the screen after changes have been
applied. This makes it easy to quickly go back to that panel and make more
changes. Panels used for postprocessing and grid adaption often fall into this
category. This type of panel includes two button controls as described
below.
Apply applies any changes you have made to
the panel, but does not close the panel. The name of this button is often
changed to something more descriptive. For example, many of the postprocessing
panels use the name Display for this button, and the adaption panels use the
name Adapt.
Close closes the panel.
All panels include the following button used to access on-line
help:
Help displays information about the controls
in the panel. The help information will appear in your web browser.
Rédigé et soutenu par TIENTCHEU NSIEWE Maxwell
Phidelo Page g
MEMOIRE DE MASTER EP« étude de la convection
naturelle turbulente dans une enceinte à paroi chauffé »
Each type of input control utilized by the panels is described in
greater detail in the User's
Guide.
5) Graphics Display Windows
Graphics display windows (e.g., Figure 52) are separate
windows that display the program's graphical output.
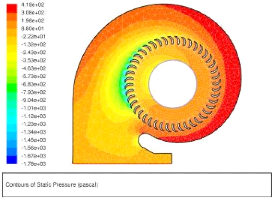
Figure 52 : sample graphics display Window
The Display Options panel can be used to change the attributes of
the graphics display or to
open another display window. The Mouse Buttons panel can be
used to set the action taken when a mouse button is pressed in the display
window.
To cancel a display operation, press <Control-C> while
data are being processed in preparation for graphical display. You cannot
cancel the operation after the program begins to draw in the graphics
window.
For Windows systems, there are special features for printing
the contents of the graphics window directly. These features are not available
on UNIX systems. See the User's Guide for further details.
Rédigé et soutenu par TIENTCHEU NSIEWE Maxwell
Phidelo Page h
MEMOIRE DE MASTER EP« étude de la convection
naturelle turbulente dans une enceinte à paroi chauffé »
|