Chapter 2. Conception and technical choices 2.1. Analysis and
design
Comfortable VR experience (minimal eye strain and motion
sickness);
· Attractive and user-friendly interfaces;
· Realistic and intuitive interactions;
· Smooth and stable performance (high frame rates, low
latency, fluid animations);
· Immersive and visually accurate environment;
· Ergonomics and hardware compatibility;
2.1.2 Design
2.1.2.1 Technical design
We now enter the modelling phase. It is an essential part of
large software projects and is also useful for medium-sized and even small
projects. For this phase, we have opted for the UML (Unified Modeling Language)
modelling language which is [39] is a standard modeling language that uses
diagrams to help developers design, understand, and document software systems
and business processes. In the following sections, we reprensent our system
with both a use case diagram and a sequence diagram.
Use case diagram
The use case diagram in Figure 2.1 shows the different
actions performed by the actors. An actor represents a person, process, or
object outside the system that interacts with it.
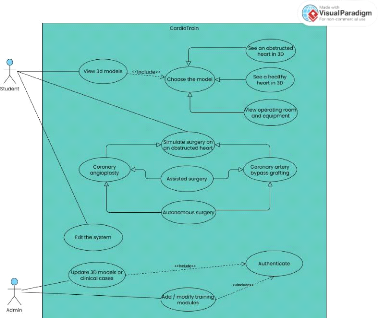
Figure 2.1: Use case diagram
19
Chapter 2. Conception and technical choices 2.1. Analysis and
design
20
Sequence diagram
The sequence diagram shows the interactions between the
system and the actors in chronological order. Figure 2.2 shows the sequence
diagram for the use case `Simulate surgery on an obstructed heart'.
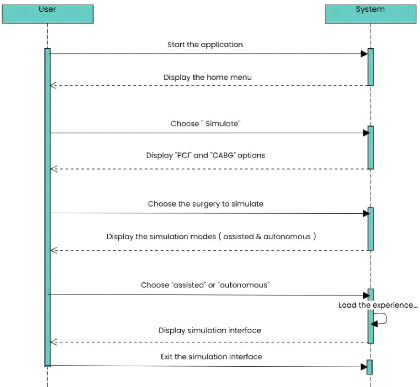
Figure 2.2: Sequence diagram for the use case "Simulate surgery
on an obstructed heart"
2.1.3 Fundamental design
The different stages of our application's development are:
· Project analysis: Understanding the needs, defining
learning objectives, features, and target users.
· 3D object modeling: Creating digital models of organs,
coronary vessels, medical tools, and the surgical environment.
· Model animation: Adding realistic movements (catheter
insertion, heartbeat, blood flow) to simulate medical procedures.
· Immersive environment assembly: Integrating the models
into a fully interactive and realistic VR scene.
·
Chapter 2. Conception and technical choices 2.2. Technical
choices
User Interface development: Designing menus, controls, and
feedback systems to guide the user through the simulation.
· Visual identity design: Creating the logo, selecting
colors and fonts to ensure a consistent visual branding.
· Demo testing: Conducting initial testing to evaluate
usability, flow, and relevance of the content.
· Project compilation and testing: Final technical
adjustments, debugging, and optimization for deployment.
· Performance tracking integration: Adding a system to
monitor user progress, scores, and provide feedback for learning.
2.2 Technical choices
Several technical resources were mobilised to develop the
virtual reality simulation application. These can be divided into two main
categories: on the one hand, tools dedicated to designing the 3D universe, such
as modelling and texturing software; on the other hand, those essential to the
functioning of the simulation, including a game engine, a programming language
and an SDK adapted to virtual reality.
2.2.1 Choice of 3D modelling and animation software
Blender
Blender is a free and open-source software for 3D modeling,
animation, rendering, compositing, and video editing. Highly versatile and
powerful, it is widely used across fields such as visual effects, game
development, architecture, and virtual reality. It enables the creation of
realistic or stylized 3D scenes, texturing, lighting, object and character
animation, as well as simulation of physical phenomena like smoke, fluids, and
collisions. As a cost-free solution, it stands as a strong alternative to
expensive professional software. [40]
Originally developed by the Dutch animation studio NeoGeo in
the 1990s, Blender was released to the public in 1998. After the bankruptcy of
NaN (Not a Number), the company that distributed Blender, the open-source
community rallied to buy back the software and continue its development under a
free license. Since then, Blender has been actively maintained by the Blender
Foundation and a large global community of developers and artists. Today, it is
recognized as a professional-grade tool used by both indie creators and major
studios. [41]
In our surgical simulation application, Blender was used to
create realistic 3D models of the human heart and simulate surgical
interactions for treating coronary obstructions. Its sculpting, rigging, and
animation tools allowed precise modeling, procedure animation, and immersive
visual integration. While alternatives like Autodesk Maya, 3ds Max, Cinema 4D,
and ZBrush exist, Blender was chosen for its free access, active community,
frequent updates, and seamless compatibility with Unity, making it ideal for
efficiently producing realistic biomedical models.
Chapter 2. Conception and technical choices 2.2. Technical
choices
22
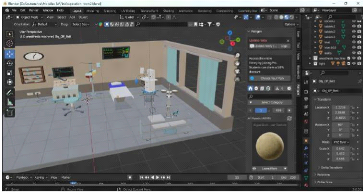
Figure 2.3: Operating room design in Blender 2.2.2 Choice
of game engine and programming language
Unity & C-Sharp (C#)
Unity, developed by Unity Technologies, is a widely used
cross-platform engine for creating interactive 2D and 3D applications,
including VR and AR simulations. Its robust tools for rendering, physics,
scripting, and asset management, along with multi-platform deployment, made it
ideal for our project. We used Unity 2020.3.41f1 (LTS) for stability and
long-term support, leveraging C#, Unity's native language, which offers clean
object-oriented syntax, automatic memory management, and seamless integration
with Unity's API. This enabled us to efficiently implement VR interactions,
simulate surgical procedures, design user interfaces, and maintain a
structured, maintainable code-base. The engine also allowed seamless
integration with 3D assets created in Blender and facilitated real-time testing
of surgical scenarios. Compared to alternatives like Unreal Engine (C++) and
Godot (GDScript), Unity provided the best combination of flexibility,
performance, and mature VR support, ensuring a smooth development process for
our immersive cardiology training software.
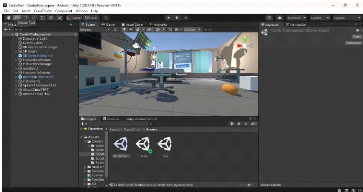
Figure 2.4: Using the Unity3D engine to create the VR
experience
Chapter 2. Conception and technical choices 2.2. Technical
choices
23
2.2.3 IDE
To write, debug, and manage our C# scripts within Unity, we
used Visual Studio Community 2017. This free, full-featured IDE developed by
Microsoft is officially supported by Unity and offers excellent integration
with it, including IntelliSense, debugging tools, error tracking, and project
organization. Its lightweight setup and reliable performance made it an ideal
choice for our workflow, especially in the context of Unity 2020.3.41f1.
Other alternatives like JetBrains Rider, Visual Studio Code,
or MonoDevelop exist, but Visual Studio Community stands out due to its deep
Unity support, professional-grade features, and longstanding stability. Its
compatibility with Unity packages and ease of configuration for VR scripting
made it especially valuable during our project.
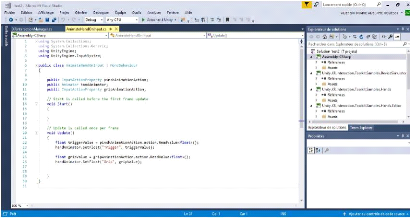
Figure 2.5: Script for animating the user's hands written in
Visual Studio 2017 2.2.4 Choice of SDK and frameworks for
YR
· SDK
The Software Development Kit we used is Oculus XR
Plugin[43], a comprehensive set of tools, libraries, and resources
provided by Unity for developers who want to create virtual reality (VR)
experiences for Oculus headsets, including Quest, Quest 2, Quest 3, and Rift
devices. It offers robust support for device tracking, controller input, hand
tracking, haptic feedback, and platform-specific optimizations, making it
easier to build immersive and responsive VR environments. Although primarily
designed for Oculus hardware, it can be combined with Unity's XR framework to
support cross-platform VR development. The choice of the Oculus XR Plugin in
our project is due to its native compatibility with Oculus devices, ensuring
precise interactions and smooth locomotion. It also excels in delivering an
intuitive and immersive user experience, which was essential for our VR
application.
· Frameworks
We used the Unity XR Interaction Toolkit, a
flexible framework designed to simplify the creation of VR and AR experiences
by providing ready-to-use components for interactions, locomotion, and user
interface control [42]. It allows developers to define interactive objects
(which users can grab, tap, or manipulate) and interactors, which represent
input devices such as VR
Chapter 2. Conception and technical choices 2.3. Development
methodology
24
controllers or hand tracking. In the context of our project,
this toolkit proved essential for enabling intuitive manipulation of surgical
tools.
2.2.5 Others softwares Adobe Illustrator
Adobe Illustrator is a widely recognized vector graphics
creation software in professional environments. Part of the Adobe suite, it can
be used independently or in conjunction with Photoshop, offering powerful
vector drawing tools. Vector images, composed of curves defined by mathematical
formulas, have the advantage of being resolution-independent, meaning they
retain their quality even when enlarged. Illustrator is suitable for creating
printed documents as well as illustrations for the web, such as logos and
posters. It offers numerous features designed to enhance productivity. For
creating the logo of our application, we chose to use Adobe Illustrator CC
2020. Figure 2.6 shows the software interface during its use for designing the
logo.
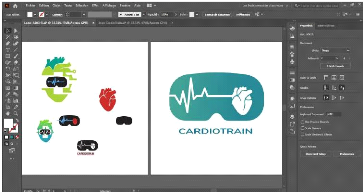
Figure 2.6: Adobe Illustrator interface screenshot
Adobe Photoshop
Adobe Photoshop is a computer-assisted editing, processing,
and drawing software, introduced in 1990 and available for MacOS and Windows
since 1992. Developed by Adobe, it is primarily used for digital photo
processing and also allows for creating images from scratch. Photoshop mainly
works with raster images, which are composed of a grid of points called pixels.
The advantage of these images is their ability to reproduce subtle color
gradations.
2.3 Development methodology
The software was developed using an Iterative and
Incremental Development approach, enabling gradual building, testing,
and refinement. This methodology is especially suitable for projects involving
3D modeling, VR integration, and interactive software. The main stages of
development are
Chapter 2. Conception and technical choices 2.3. Development
methodology
25
outlined below:
· Specification definition: The project started by
defining application requirements and objectives, detailing expected features,
user interactions, and the scope of simulated surgical procedures. This stage
provided a solid foundation for all subsequent development activities.
· Project planning and task breakdown: The project was
divided into smaller, manageable tasks, each producing deliverables that
contributed to the overall application. This approach enabled effective
progress tracking, task prioritization, and iterative improvements.
· Information gathering: Medical accuracy was ensured by
collecting information from online sources, cardiology students, and
professional cardiologists. This research informed the VR representation of
operating procedures and surgical workflows.
· Scenario and workflow development: Application
scenarios and surgical procedure scripts were created to define user
interactions, procedural sequences, and expected behaviors within the virtual
environment.
· Modeling and asset creation
- Installation and setup of Blender and Adobe
Photoshop - Modeling, texturing, and basic animation of 3D
objects - Exporting 3D models for integration into Unity
· Integration and Incremental Development in Unity
- Design of the logo and graphic charter to
ensure visual consistency;
- User interface (UI) design and layout;
- Installation of Unity and required SDKs;
- Importation of characters and 3D models;
- Creation of different scenes and VR camera
configuration;
- Learning and applying C# to implement
interactive features;
- Writing scripts to manage events and
functionalities;
- Development of incremental features and
functionalities;
- Deployment on the Oculus Quest 3 headset for
iterative testing;
· Testing, validation, and refinement: Each increment of
the application was tested to ensure correct functionality, usability, and
immersion. Feedback from testing guided adjustments and improvements, allowing
the application to evolve gradually toward the final version.